- “All hospitals have diseases, but most of them don't have a flesh eating zombie virus. Now you must face off against hordes of zombies in side an undead hosptial. Will you escape or become a permanent patient.”
- ―Level Description
| Breakout Zone | |
|---|---|
 Breakout Zone Title Screen | |
| Vital statistics | |
| Prev Level | None |
| Next Level | Unknown |
| Created By | GreenArkham |
| Creation Date | 7/4/2013 (U.K)
4/7/2013 (U.S.A) |
| Characters | Matty Winslow
Wayne Truman Paquito 'Pancho Villa' Mendez Jason Silvers |
| Enemies | Patient Zombies
Nurse Zombies Madmen Doctorz |
| Location | Hospital in New York City |
| Date | 3/1/2027 (U.S.A) |
Breakout Zone is the default map on World War Z. It is an abbandoned hospital located in New York City, that has been overrun by hordes of zombies.
Storyline
Winslow's Squad are surrounded by zombies, left, right and centre. There only way out is back alley behind them. They speed down the alley and emerge in another street with zombies coming from both ends. With nowhere left to go the team start to panic until Winslow spots a nearby hospital that looks relatively zombie free. They rush to the hospital but find that it is locked, so they barricade themselves in the car park until they can open the door. Little do they know that behind that door, is the biggest zombie hive in the city.
Opening Cutscene
Main Article: Breakout Zone/Opening Cutscene Transcript
The Map (Areas/Rooms) (Plus weapon, perks, a mystery box locations)
The map consists of 3 building; The Main Building, A&E, and the Research Labs. There is also multiple outdoor areas. As usual, players start with an M1911 Pistol (only at half ammo), a Combat Knife and 4 M67 Frag Grenades.
Main Building
The Main Building is the largest part of the map. The player just outside of it in a barricaded car park that has an M14 and a Olympia. Once inside, the player is in a Reception Area that has a Quick Revive Machine for 500 points (on solo) or 1500 points (on multiplayer) and a Mystery Box Spawn Point (but the box never starts their). Past that there is the Main Hall. This has a staircase to the second and third floor or the player can use the elevator for 500 points and get taken to a random floor (including The Roof). The Main hall also has a MP5 on the wall for 1000 points.There is also a Gift Shop (that is already opened) and a Cafeteria on the first floor, here there is a Choc Therapy Machine for 2000 points. The Second Floor has a one way ramp that leads back to The Car Park and a Surgery Ward; here there is an Operating Theatre which has a PhD Flopper Machine for 2500 points and is where Doctorz spawn. There is also a CAT Scan Room which is required to complete the easter egg. There is also a Mystery Box Spawn Point at the end of the ward (but the box never starts here). The third floor has Patient Rooms; here there is a Construction Table (for The Die-fibrillator) and a B23R Pistol for 1000 points. There is also the 4 teleporters that will randomly teleport the player between the 4 patient rooms. The third floor also has a Staircase to The Roof. The Roof is a big open space with a Helipad in the middle (which is essential for the easter egg), the helipad is enclosed in a metal cage that you need a key to open (the key can be found an one of 2 locations around the map). There is a Mystery Box Spawn Point up here (but the box never starts here) and a Bowie Knife for 3000 points. There is also a Stamin-Up Machine for 2000 points. The Roof also has The Ropes that the player can use to slide down to the bottom of the Main Hall.
A&E Building
The A&E is the smallest building on the map (only to small floors). The Bottom floor (which is connected to the Main building by a corridor. The bottom floor is a waiting room that has a Speed Cola Machine for 3000 points and a Mystery Box Spawn Point (the box always starts here). The top floor has a room where patient get casts put on etc. Here there is a Striker shotgun on the wall for 1500 points. The next room is the X-Ray Room. A small but interesting room, it has the main X-Ray room and a small control room at the side of it. When inside this room everyone appears as an X-ray skeleton, this makes it hard to distinguish allies from enemies. The X-Ray Room has an X-Ray trap that burns away skin and muscle leaving only charred bones which can be used for 750 points. There is also a Who's Who Machine in this room for 2000 points and Semtex Grenades in the control room.
The Garden
The Garden is a small area inbetween The Main Building and The Research Labs, there are also two paths that come off from The Garden, one that leads to A&E and another that leads to The Car Park (can only be opened from the garden side). There is a Mystery Box Spawn Point (but the never starts here). It also has a Juggernog Machine for 2500 points and an Electric Cherry Machine for 2000 points.
Research Labs
The Research Labs is a medium sized building at the back of the map. It can be accessed by either the main door from the garden or the tunnel from the Surgery Ward in the Main Building. The main door leads into the lobby, a circular room with a circular reception desk in the middle, there is a Mystery Box Spawn Point next to the desk (but the box never starts here). There are two other rooms on the bottom floor. One is research lab with lots of chemicals and lab equippment. Here there is a Double Tap Root Beer Machine for 2000 points and a Construction Table (for The Medicator). The second room is a Mourge, zombie can crawl out of the mortician's fridge. There is a Tombstone Soda Machine for 2000 points. The top floor also has 2 rooms. The first one is another lab but this one has multiple cages of varying sizes, some of which, contain animal remains suggesting that this was an animal testing lab. This room has a Mule Kick Machine for 4000 points. The second room on the top floor is and office space filled with computer desks. The Tunnel leading from the Main Building is connected to this room. This room has a Mystery Box Spawn Point (but the box never starts there) and a Dragunov Sniper Rifle on the wall for 1200 points. There is also a staircase at the back of the room leading to the roof. The roof is empty, unlike the Main Building roof, apart from a Deadshot Daiquiri Machine for 1500 points.
The Secret Room
Hidden in the bushes of the garden is a switch (the wire leading from it to the statue in the middle of the garden is visible). When the player activates this switch, a door opens up in the stand of the statue revealing set of stairs. Down these stairs is a hidden room. In this room is the power switch and a Pack a Punch Machine (both of which are required to complete the major easter egg). There is also the Galvaknuckles for 6000 points.
Perks/Locations
Below is a list of the perks featured in Breakout zone. It features 12 perks (11 original + 1 new perk) which is more than any other zombie map (at time of publishing 18/4/12). Because of the large number of perks. The player is allowed to collect 5 perks instead of the original 4 perks. The perks are;
Quick Revive-Found in The Reception Area in The Main Building. Costs 500 points (on solo) or 1500 points (on multiplayer). NOTE: On solo, the Quick Revive Machine will disapear after 3 uses
Choc Therapy-Found in The Cafeteria in The Main Building. Costs 2000 points
PhD Flopper-Found in The Operating Theatre in The Main Building. Costs 2500 points
Stamin-Up-Found on The Roof of The Main Building. Costs 2000 points
Speed Cola-Found in The Waiting Room of The A&E Building. Costs 3000 points
Who's Who-Found in The X-Ray Room of The A&E Building. Costs 2000 points
Juggernog-Found in The Garden. Costs 2500 points
Electric Cherry-Found in the Alley between The Garden and The Car Park. Costs 2000 points
Double Tap Root Beer-Found in The Chemical Lab in The Research Labs. Costs 2000 points
Tombstone Soda-Found in The Mourge in The Research Labs. Costs 2000 points
Mule Kick-Found in The Animal Testing Lab in The Research Lab. Costs 4000 points
Deadshot Daiquiri-Found in The Offices in The Research Labs. Costs 1500 points
")
")
")
")
")
")
")
")
")
")
")
Enemies
Breakout Zone has 4 different types of zombies. Two are normal types of zombie, and the other two are special/boss zombies.
Patient Zombies & Nurse Zombies
Patient Zombies and Nurse Zombies are the typical zombies in Breakout Zone, they are just regular zombie with a different skin. The patient zombies are dressed in patient gowns and some have bandages or casts. Nurse zombies are dressed in a nurse uniforms.
Madmen
Madmen are a special enemy that appear in the WWZ map Breakout Zone. They are similar to hellhounds and minions as they will appear every 5, 6 or 7 rounds. They resemble crawler zombies in appearance but are wearing broken, bloodstained straight jackets. Once they spawn, Madmen will hunt down the player, crawling along the walls and ceiling in the proccess. When a Madman round ends, the players will be rewarded with a Max Ammo
Doctorz
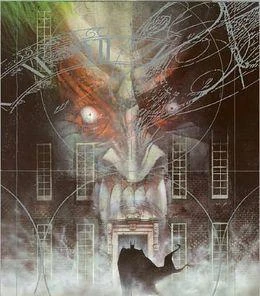
Doctorz are boss zombies in Breakout Zone. They were doctors at the hospital before they were turned into zombies. Doctorz have several powers; first of all, they run faster and do more damage than normal zombies. They also have the ability to release a blast of energy that ressurects all dead zombies in the vacinity. Doctorz also have the power to teleport across the map. They will either do this to get closer to the player or to avoid taking damage. However, when you kill a Doctor it will drop a Random Perk Bottle which will reward all players with a random perk (unless they already have 5 perks). If a Doctor is not killed within 2 minutes, it will disapear, this will cause all the power-ups next round to become power-downs as well as the Doctor returning in 2 rounds time. Doctorz will spawn randomly at any time past round 5 and will always spawn in the Operating Theatre in The Main Building (even if it has not been opened yet). They will appear in an ordinary round so that they can ressurect dead zombies. Doctorz are dressed in a a black, bloodstained scrubs. A Doctor appears on the Breakout Zone Title Screen.
Power-Downs
Power-Downs are the opposites to Power-Ups. They resemble Power-Ups except that they are black and glow red, instead of being gold and glowing green. Unlike Power-Ups, Power-Downs will drift about the map, making it more likey for players to run in to them. They;
- Min-Ammo: Removes all the players back-up ammo. Mirrors Max-Ammo
- Imposa-Kill: Temporarily makes all zombies invincible. Mirrors Insta-Kill
- Demolisher: Breaks down all barriers. Mirrors Carpenter
- Half Points: Temporarily makes all points earned by players halved: Mirrors Double Points
- Ressurection: Brings all dead zombies back to life. Mirrors Nuke
- Closing Time: Temporarily removes the Mystery Box. Mirrors Fire Sale
- Sober Up: Removes one perk from every player. Mirrors Random Perk Bottle
Buildables
Breakout Zone has 2 buildable weapons/items. The first one is The Die-fibrilator, which is a placable trap that will temporarily stun/sedate zombies. The second is a Wonder Weapon called The Medicator shoots the zombies with a Syringe.
The Die-fibrillator
The Die-fibrillator is a buildable trap on Breakout Zone. It works by scanning the whoever walks past it for a heartbeat. If they don't have a heartbeat (like the zombies) it zaps them with electricity which stuns them and can kill them if they are near it long enough (similar to the Guardian). Below is a list of the parts needed to craft The Die-fibrillator along with their locations.
Heartbeat Monitor-Makes the main body. Found in The Patient Rooms in The Main Building
Stethoscope-Makes the Scanner/Sensor. Found in the Top floor room in the A&E Building, just before the X-Ray Room.
Defibrillator-Makes the paddles that zaps the zombies. Found in The Lobby in The Research Labs
Car Battery-Makes the power for the the paddles. Found in the car park next to one of the cars
The Medicator
The Medicator is a buildable Wonder Weapon on Breakout Zone. It fires syringes at zombies which acts like a single shotgun slug. Below is a list of the parts needed to craft The Medicator along with their locations.
Vaccuum Cleaner-Makes the main body. Found either in the Gift Shop or The Cafeteria in The Main Building
Syringe Wheel-Makes the ammo. Found in the Animal Testing Lab in The Research Labs
Medical Pins-. Makes the stock and Muzzle. Found in the Operating Theatre in the Main Buidling
Motorike Handbrake-Makes the grip and trigger. Found in The Waiting Room in The A&E Building
Weapons
| Starting Weapons |
|---|
|
M1911 ") Knife' M67 Frag Grenade |
| Off Wall Weapons |
|---|
|
M14 - 500 points Olympia - 500 points MP5 - 1500 points B23R - 1000 points ") Striker - 1200 points ") Dragunov - 1200 points ") Bowie Knife - 3000 points ") Galvaknuckles - 6000 points ") Semtex Grenades - 250 points |
Mystery Box Weapons
Assault Rifles
- M16
- Enifeld
- Famas
- Galil
- AUG
- FN FAL
- AK-47
- Commando
- G11
- MTAR
- Type 25
- SWAT-556
- FAL OSW
- M27
- SCAR-H
- SMR
- M8A1
- AN-94
Submachine Guns
- Mac 11
- Mac 11 Dual Wield
- Ak74u
- Uzi
- PM63
- PM63 Dual Wield
- MPL
- Spectre
- Kiparis
- Kiparis Dual Wield
- PDW-57
- Vector K10
- MSMC
- Chicom CQB
- Skorpion EVO
Shotguns
- Stakeout
- SPAS-12
- HS-10
- HS-10 Dual Wield
- Remington 870 MCS
- S12
- KSG
- M1216
Light Machine Guns
- HK21
- RPK
- M60
- Stoner63
- MK 48
- LSAT
- QBB LSW
- HAMR
Sniper Rifle
- WA2000
- L96A1
- PSG1
- SVU-AS
- DSR 50
- Ballista
- XPR-50
Pistols
- ASP
- ASP Dual Wield
- Makarov
- Makarov Dual Wield
- Python
- Python Dual Wield
- CZ75
- CZ75 Dual Wield
- Five Seven
- Five Seven Dual Wield
- Tac-45
- Tac-45 Dual Wield
- Executioner
- Executioner Dual Wield
- KAP-40
- Kap-40 Dual Wield
Launchers
- M72
- RPG-7
- Strela-3
- SMAW
- FHJ-18 AA
- War Machine
Specials
- Ballistic Knife
- Crossbow
- Death Machine
Wonder Weapons
")
")
")
")
")
")
Easter Eggs
Major Easter Egg: Rescue From Above
Minor Easter Eggs: Undead Man Walking
Musical Easter Egg: Live to Win - Paul Stanley (Click here for the easter egg steps)
Achievments/Trophies
- Please Sign in-Play a game of Breakout Zone
- Ascend to Victory-Call in your rescue (Complete the 'Rescue From Above' easter egg)
- Back to the Freezer-Kill the dead man (Complete the 'Undead Man Walking' easter egg)
- The Crazies-Survive a Madman round
- You Must be Crazy-Survive a Madman round past round 15
- Doctorz Appointment-Kill a Doctor
- Taste of Your Medicine-Kill a Doctor with The Medicator
- Metalic Surgery-Pack-a-Punch The Medicator
- Doctorz Orderz-Obtain a Perk from a Doctor
- A Shocking Development-Build The Die-fibrillator whilst using Electric Cherry, Choc Therapy and Galvaknuckles
- Life is Wunderbar-Obtain 4 Wonder Weapons at the same time
- Perk-a-holic-Have all 12 perks active in one game
Trivia
- This is the first zombie map to contain a MW3 weapon, the Striker